nginx之讀寫分離
1.實驗拓撲
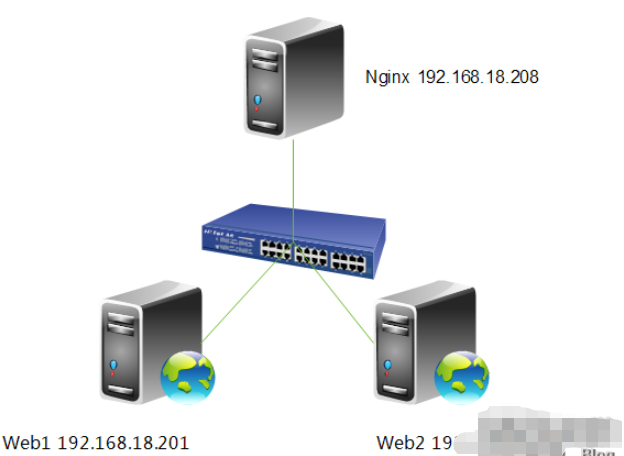
需求分析,前端一臺nginx做負載均衡反向代理,后面兩臺httpd服務器。整個架構是提供bbs(論壇)服務,有一需求得實現讀寫分離,就是上傳附件的功能,我們上傳的附件只能上傳到web1,然后在web1上利用rsync+inotify實現附件同步,大家都知道rsync+inotify只能是主向從同步,不能雙向同步。所以web1可進行寫操作,而web2只能進行讀操作,這就帶來讀寫分離的需求,下面我們就來說一下,讀寫分離怎么實現。
2.webdav功能說明
webdav (web-based distributed authoring and versioning) 一種基于 http 1.1協議的通信協議。它擴展了http 1.1,在get、post、head等幾個http標準方法以外添加了一些新的方法,使應用程序可直接對web server直接讀寫,并支持寫文件鎖定(locking)及解鎖(unlock),還可以支持文件的版本控制。這樣我們就能配置讀寫分離功能了,下面我們來具體配置一下。
3.修改配置文件
[root@nginx?nginx]#?vim?/etc/nginx/nginx.conf server?{ ????listen????80; ????server_name?localhost; ????#charset?koi8-r; ????#access_log?logs/host.access.log?main; ????location?/?{ ????????proxy_pass?http://192.168.18.202; ????????if?($request_method?=?"put"){ ????????????proxy_pass?http://192.168.18.201; ????????} ????} }
4.重新加載一下配置文件
[root@nginx?~]#?service?nginx?reload nginx:?the?configuration?file?/etc/nginx/nginx.conf?syntax?is?ok nginx:?configuration?file?/etc/nginx/nginx.conf?test?is?successful 重新載入?nginx:??????????????????????[確定]
5.配置httpd的webdav功能
[root@web1?~]#?vim?/etc/httpd/conf/httpd.conf

注,在
6.重新啟動一下httpd
[root@web1?~]#?service?httpd?restart 停止?httpd:????????????????????????[確定] 正在啟動?httpd:??????????????????????[確定]
7.測試一下
[root@nginx?~]#?curl?http://192.168.18.201 <h1>web1.test.com</h1> [root@nginx?~]#?curl?http://192.168.18.202 <h1>web2.test.com</h1>
注,web1與web2訪問都沒問題。
[root@nginx?~]#?curl?-t?/etc/issue?http://192.168.18.202 nbsp;html?public?"-//ietf//dtd?html?2.0//en"> <title>405?method?not?allowed</title><h1>method?not?allowed</h1> the?requested?method?put?is?not?allowed?for?the?url?/issue. <hr><address>apache/2.2.15?(centos)?server?at?192.168.18.202?port?80</address>
注,我們上傳文件到,web2上時,因為web2只人讀功能,所以沒有開戶webdav功能,所以顯示是405 method not allowed。?
[root@nginx?~]#?curl?-t?/etc/issue?http://192.168.18.201 nbsp;html?public?"-//ietf//dtd?html?2.0//en"> <title>403?forbidden</title><h1>forbidden</h1> you?don't?have?permission?to?access?/issue on?this?server. <hr><address>apache/2.2.15?(centos)?server?at?192.168.18.201?port?80</address>
注,我們在web1開啟了webdav功能,但我們目錄是root目錄是不允許apache用戶上傳的,所以顯示的是403 forbidden。下面我們給apache授權,允許上傳。
[root@web1?~]#?setfacl?-m?u:apache:rwx?/var/www/html/
下面我們再來測試一下,
[root@nginx?~]#?curl?-t?/etc/issue?http://192.168.18.201 nbsp;html?public?"-//ietf//dtd?html?2.0//en"> <title>201?created</title><h1>created</h1> resource?/issue?has?been?created. <hr><address>apache/2.2.15?(centos)?server?at?192.168.18.201?port?80</address>
注,大家可以看到我們成功的上傳了文件,說明nginx讀寫分離功能配置完成。最后,我們來查看一下上傳的文件。
[root@web1?~]#?cd?/var/www/html/ [root@web1?html]#?ll
總用量 12
drwxr-xr-x?2?root??root??4096?9月??4?13:16?forum -rw-r--r--?1?root??root???23?9月??3?23:37?index.html -rw-r--r--?1?apache?apache??47?9月??4?14:06?issue


