這篇文章主要為大家詳細介紹了centos 7下mysql 5.7.18 安裝配置方法圖文教程,具有一定的參考價值,感興趣的小伙伴們可以參考一下
介紹如何在Linux下安裝mysql 5.7.18
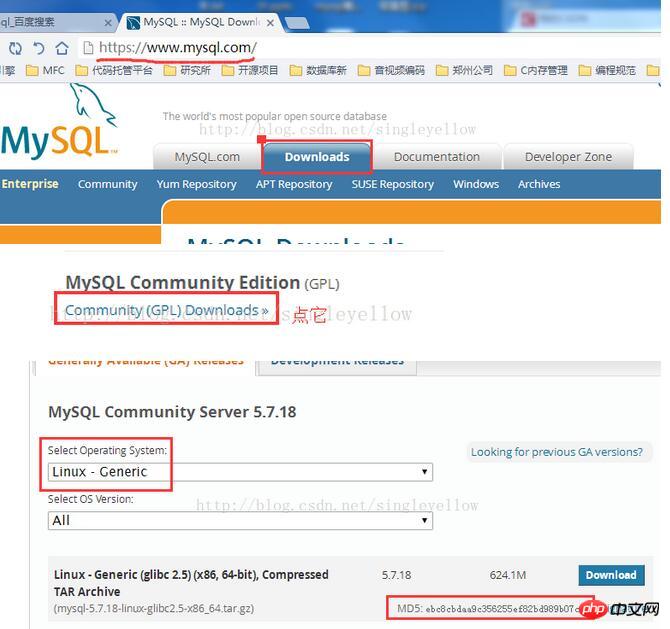
1、下載MySQL:官網(wǎng)www.mysql.com/,點擊Downlosas,翻到網(wǎng)頁底部,下載社區(qū)版,一路點下去,選擇通用Linux,下載64位那個,注意檢查MD5
值。

2、安裝關(guān)鍵步驟,直接貼出命令
[cpp]?view?plain?copy?在CODE上查看代碼片派生到我的代碼片 [root@CentOS?MySQL]#?tar?-xzvf?mysql-5.7.17-linux-glibc2.5-x86_64.tar.gz?-C?/usr/local? [root@CentOS?MySQL]#?cd?/usr/local? [root@CentOS?local]#?mv?mysql-5.7.17-linux-glibc2.5-x86_64?mysql? [root@CentOS?local]#?cd?mysql? [root@CentOS?mysql]#?mkdir?data? [root@CentOS?mysql]#?groupadd?mysql? [root@CentOS?mysql]#?useradd?-r?-g?mysql?-s/bin/false?mysql? [root@CentOS?mysql]#?chown?-R?mysql:mysql?./? [root@CentOS?mysql]#?bin/mysqld?--initialize?--user=mysql?--basedir=/usr/local/mysql?--datadir=/usr/local/mysql/data? 2017-02-23T07:43:03.404885Z?0?[Warning]?TIMESTAMP?with?implicit?DEFAULT?value?is?deprecated.?Please?use?--explicit_defaults_for_timestamp?server?option?(see?documentation?for?more?details).? 2017-02-? ? 23T07:43:04.442174Z?0?[Warning]?InnoDB:?New?log?files?created,?LSN=45790? 2017-02-23T07:43:04.588507Z?0?[Warning]?InnoDB:?Creating?foreign?key?constraint?system?tables.? 2017-02-23T07:43:04.646721Z?0?[Warning]?No? ? existing?UUID?has?been?found,?so?we?assume?that?this?is?the?first?time?that?this?server?has?been?started.?Generating?a?new?UUID:?b5c8e226-f99b-11e6-beb5-b7c1a1e39029.? 2017-02-23T07:43:04.671492Z?0?[Warning]? ? Gtid?table?is?not?ready?to?be?used.?Table?'mysql.gtid_executed'?cannot?be?opened.? 2017-02-23T07:43:04.672338Z?1?[Note]?A?temporary?password?is?generated?for?root@localhost:?I%e=s+lfx9ko? [root@CentOS?mysql]#? ? bin/mysql_ssl_rsa_setup?--datadir=/usr/local/mysql/data? Generating?a?2048?bit?RSA?private?key? .....................................+++? ..............................+++? writing?new?private?key?to?'ca-key.pem'? -----? Generating?a?2048?bit?RSA?private?key? .........................................+++? .........................+++? writing?new?private?key?to?'server-key.pem'? -----? Generating?a?2048?bit?RSA?private?key? ..................................................+++? ...................................................................................................................................................................................................+++? writing? ? new?private?key?to?'client-key.pem'? -----? [root@CentOS?mysql]#?cd?support-files? [root@CentOS?support-files]#?cp?my-default.cnf?/etc/my.cnf? [root@CentOS?support-files]#?gedit?/etc/my.cnf? [root@CentOS?support-files]#?cp?mysql.server?/etc/init.d/mysqld? [root@CentOS?support-files]#?service?mysqld?start? Starting?MySQL.Logging?to?'/usr/local/mysql/data/CentOS.cn.err'.? .?SUCCESS!? [root@CentOS?support-files]#?ps?aux?|grep?mysql? root??18279?0.0?0.0?11764?1576?pts/0?S?17:34?0:00?/bin/sh? ? /usr/local/mysql/bin/mysqld_safe?--datadir=/usr/local/mysql/data?--pid-file=/usr/local/mysql/data/CentOS.cn.pid? mysql??18449?1.9?9.5?1182688?177940?pts/0?Sl?17:34?0:00?/usr/local/mysql/bin/mysqld?--? ? basedir=/usr/local/mysql?--datadir=/usr/local/mysql/data?--plugin-dir=/usr/local/mysql/lib/plugin?--user=mysql?--log-error=/usr/local/mysql/data/CentOS.cn.err?--pid-file=/usr/local/mysql/data/CentOS.cn.pid? ? --socket=/tmp/mysql.sock?--port=3306? ? [root@CentOS?support-files]#
一行一行解釋:
把壓縮包解壓到/usr/local目錄下,就是把MySQL安裝在該目錄下。
切換到/usr/local,把剛才解壓后的文件夾重命名為mysql。
在mysql目錄下創(chuàng)建data文件夾,用來存儲MySQL的數(shù)據(jù)。
增加用戶組mysql。
增加用戶名mysql屬于mysql組。
修改mysql目錄的擁有者和組。
初始化MySQL,分兩步:
第一步,bin/mysqld? 注意后面給的參數(shù),之一部會產(chǎn)生一個臨時密碼,保存,后面登錄數(shù)據(jù)庫要用到;
第二步,bin/mysql_ssl_rsa_setup,看起來像是對數(shù)據(jù)庫安全的處理,注意后面給的參數(shù)。
切換到support-files目錄。
把my-default.cnf拷貝到 /etc/my.cnf,注意CentOS7自帶了一個my.cnf文件,覆蓋掉。
編輯該文件,只對18,19,20,22行修改,如下
把mysql.server文件拷貝到/etc/init.d/mysqld下,主要負責MySQL的開機啟動。
啟動mysqld進程。
查詢mysql進程。有兩個: /mysql/bin/mysqld_safe、/mysql/bin/mysqld
3、后續(xù)配置:
登錄mysql,修改臨時密碼:/usr/local/mysql/bin/mysql -u root -p 回車輸入初始化時生成的臨時密碼,修改密碼:
set password for? ‘root’@localhost=password(‘xxxxxx’);
每次登錄mysql客戶端嫌輸絕對路徑麻煩,就建一個軟連接:ln -s? /usr/local/mysql/bin/mysql? /usr/bin/mysql,這樣也省去了配PATH路徑的麻煩。
mysqld的開機啟動,使用chkconfig命令
chkconfig?--add?mysqld?#增加mysqld服務(wù) chkconfig?--list????#列出所有的系統(tǒng)服務(wù)
看一下是不是在所有等級都是打開狀態(tài),例如:
chkconfig?--level?35?mysqld?on? #設(shè)定mysqld在等級3和5為開機運行服務(wù)


