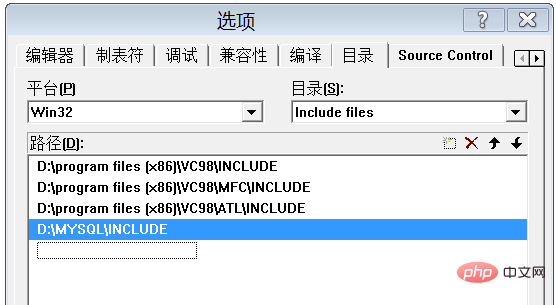
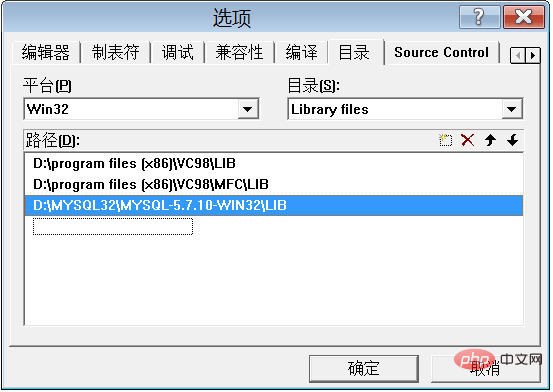
vc連接mysql數據庫的方法:首先打開VC6;然后在中間列表框中添加本地安裝MySQL的include目錄路徑;接著選中“Library files”并添加MySQL的Lib目錄路徑;最后進行編程測試即可。

推薦:《mysql視頻教程》
一、MySQL的安裝
Mysql的安裝去官網下載就可以。。。最新的是5.7版本。。
二、VC6.0的設置
(1)打開VC6.中選0?工具欄Tools菜單下的Options選項,在Directories的標簽頁中右邊的“Show?directories?for:”下拉列表中“Includefiles”,然后在中間列表框中添加你本地安裝MySQL的include目錄路徑。如圖:
? ?
(2)在上面說到的“Show?directories?for:”下拉列表中選中“Library?files”,然后添加你本地安裝MySQL的Lib目錄路徑。如圖:
? ?
**這里要說明一下:細心的人會發現我的這個目錄和上一個圖中的不一樣,這是因為這個錯誤:libmysql.lib : fatal Error LNK1113: invalid machine 無效的服務器
這是因為vc開發的是32位的程序,而mysql數據庫是64位導致的,你用32位的程序去操作64位的數據庫肯定會出錯,我在下一篇博文中將詳細說明怎么解決。
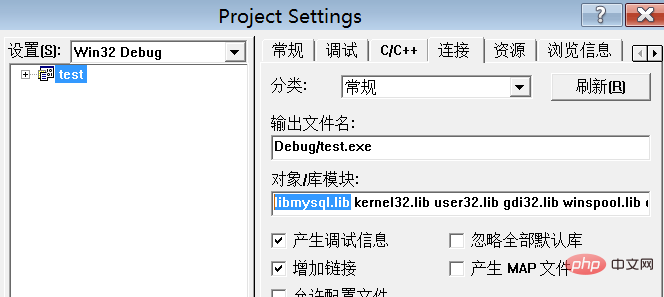
(3)在“Project?settings->Link:Object/library?modules”里面添加“libmysql.lib”。
? ? ? ??
(5)建議將“libmySQL.lib、libmySQL.dll”拷到你所建的工程的目錄下。
這兩個文件在D:Mysqllib目錄下。
三、編程實現
1. 一個簡單的小程序,看看是否能連接成功。。。
#include?<stdio.h> #include?<windows.h> #include?<mysql.h>? int?main() { ???????MYSQL?mysql; ???????mysql_init(&mysql);?//初始化mysql結構 ???????if(!mysql_real_connect(&mysql,"localhost","myuser","123456","student_db",3306,NULL,0)) ??????????????printf("n連接數據庫時發生錯誤!n"); ???????else ??????????????printf("n連接數據庫成功!n"); ???????mysql_close(&mysql);?//釋放數據庫 ?? ???????return?0; }</mysql.h></windows.h></stdio.h>
mysql_real_connect(&mysql,”localhost”,”myuser”,”123456″,”student_db”,3306,NULL,0)//myuser是我的用戶名,“123456”是密碼,“student_db”是數據庫,3306是端口號
? 2.實現查詢小程序
//?test.cpp?:?Defines?the?entry?point?for?the?console?application. // #include?<stdio.h> #include?<windows.h> #include?"StdAfx.h" #include?<winsock.h>?? #include?<iostream>?? #include?<string>?? #include?<mysql.h>?? using?namespace?std;?? //不需要單步調試的就注釋掉?? //#define?STEPBYSTEP?? ?? void?pause(){?? ?? ????#ifdef?STEPBYSTEP?? ????????system("pause");?? ????#endif?? }?? void?writeToFile(const?char?*s)?? {?? ?? ?????FILE?*fp=fopen("info.txt","rw");?? ?????fprintf(fp,s);?? ?????fclose(fp);?? ?? }?? ?/*?int?main() { ???????MYSQL?mysql; ???????mysql_init(&mysql);?//初始化mysql結構 ???????if(!mysql_real_connect(&mysql,"localhost","myuser","123456","student_db",3306,NULL,0)) ??????????????printf("n連接數據庫時發生錯誤!n"); ???????else ??????????????printf("n連接數據庫成功!n"); ???????mysql_close(&mysql);?//釋放數據庫 ?? ???????return?0; }*/ int?main(int?argc,?char*?argv[]){?? ?? ????coutname<p> 運行結果:</p> <p><img src="https://img.php.cn/upload/article/000/000/020/c37c1be95fb2e0eadee2656b6553e186-3.png" alt=""></p> <p>?至此連接成功。。哈哈。。</p></mysql.h></string></iostream></winsock.h></windows.h></stdio.h>


