在本系列的第一部分中,我向您展示了如何通過添加自定義徽標和一些內容來自定義 WordPress 登錄屏幕。自定義樣式。
用戶登錄后將看到的下一個內容是儀表板,因此在本教程中,您將學習如何通過刪除一些現有元框、移動一些元框以及添加一些新元框來自定義它。
我將在本教程中演示的步驟是:
- 刪除一些可能會讓用戶感到困惑的元框
- 將元框移動到屏幕上的不同位置
- 添加您自己的自定義元框來幫助用戶
我將創建一個插件來執行此操作 – 如果您在完成本系列第 1 部分之后已經創建了一個插件,您可能更愿意將本教程中的代碼添加到該插件中,從而為您提供一個包含所有功能的插件您的管理自定義。
完成本教程需要什么
要完成本教程,您需要:
- WordPress 安裝
- 訪問您網站的插件文件夾以添加插件
- 用于創建插件的文本編輯器
設置插件
在插件的開頭,我添加以下幾行:
/* Plugin Name: WPTutsPlus Customize the Admin Part 2 - The Dashboard Plugin URI: https://rachelmccollin.co.uk Description: This plugin supports the tutorial in WPTutsPlus. It customizes the WordPress dashboard. Version: 1.0 Author: Rachel McCollin Author URI: http://rachelmccollin.com License: GPLv2 */
1。刪除不需要的元框
第一步是刪除我們不需要的任何元框。這僅適用于角色低于“管理員”的用戶,因為我仍然希望以管理員身份訪問所有 WordPress 儀表板。
我將首先查看具有“編輯者”角色的用戶在訪問儀表板時看到的內容:
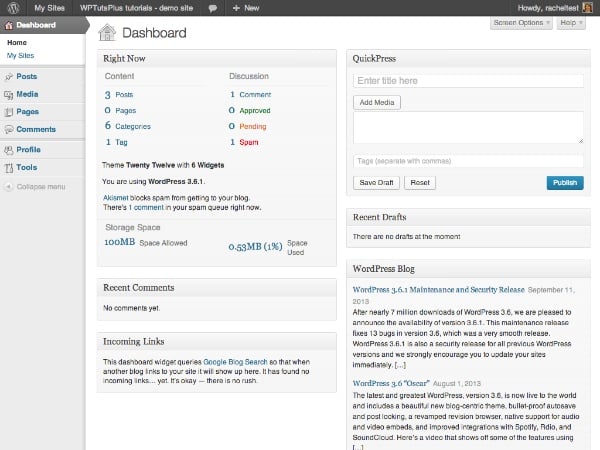
其中內容太多,用戶必須向下滾動才能看到它,而且對于不熟悉 WordPress 的用戶來說,其中很多內容都是無用的。此外,如果您的網站不使用評論或 pingback,那么這些元框就沒有多大幫助。
所以我要移動以下內容:
- 最近評論
- 傳入鏈接
- 快速新聞
- WordPress 博客
- 其他 WordPress 新聞
要為管理員以外的用戶刪除這些元框,請將以下內容添加到您的插件中:
// remove unwanted dashboard widgets for relevant users function wptutsplus_remove_dashboard_widgets() { $user = wp_get_current_user(); if ( ! $user->has_cap( 'manage_options' ) ) { remove_meta_box( 'dashboard_recent_comments', 'dashboard', 'normal' ); remove_meta_box( 'dashboard_incoming_links', 'dashboard', 'normal' ); remove_meta_box( 'dashboard_quick_press', 'dashboard', 'side' ); remove_meta_box( 'dashboard_primary', 'dashboard', 'side' ); remove_meta_box( 'dashboard_secondary', 'dashboard', 'side' ); } } add_action( 'wp_dashboard_setup', 'wptutsplus_remove_dashboard_widgets' );
通過檢查用戶是否具有 manage_options 能力(該能力僅由管理員擁有),針對管理員以下的用戶角色。然后它刪除元框,最后將函數附加到 wp_dashboard_setup 掛鉤。
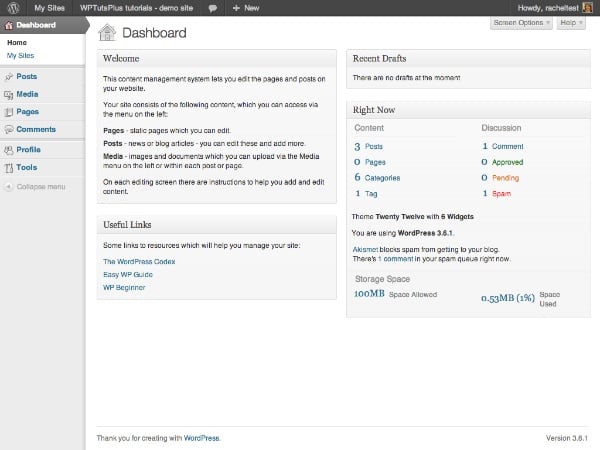
現在儀表板看起來干凈多了:
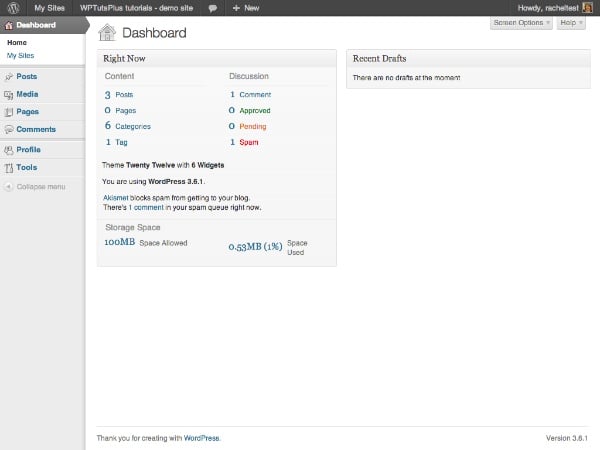
可能有點太稀疏了!別擔心,我很快就會向您展示如何添加一些新的元框。
但首先我將移動“立即”元框,因為我想在左上角位置添加另一個元框。
2。移動儀表板元框
移動儀表板元框可以通過優先考慮您或您的用戶最需要使用的元框來幫助您使儀表板與您的網站更加相關。我會將“Right Now”元框移至右側。
在您的插件中,添加以下代碼:
// Move the 'Right Now' dashboard widget to the right hand side function wptutsplus_move_dashboard_widget() { $user = wp_get_current_user(); if ( ! $user->has_cap( 'manage_options' ) ) { global $wp_meta_boxes; $widget = $wp_meta_boxes['dashboard']['normal']['core']['dashboard_right_now']; unset( $wp_meta_boxes['dashboard']['normal']['core']['dashboard_right_now'] ); $wp_meta_boxes['dashboard']['side']['core']['dashboard_right_now'] = $widget; } } add_action( 'wp_dashboard_setup', 'wptutsplus_move_dashboard_widget' );
這會將“現在”元框從左側的“正常”位置移動到“右側”位置,如屏幕截圖所示:
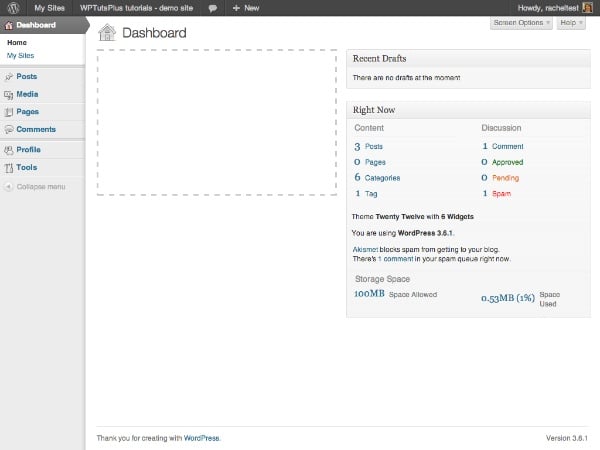
下一步是用幾個自定義元框填充左側的缺口。
3。添加新的儀表板元框
將元框添加到儀表板包含兩個步驟:
- 使用 wp_add_dashboard_widget() 函數定義小部件的參數 – 它的 ID、標題和定義其內容的回調函數。通過 wp_dashboard_setup 掛鉤激活此功能。
- 編寫回調函數來定義元框的內容。
在這種情況下,我將為所有用戶添加新的元框,因此我不會檢查用戶功能 – 如果您愿意,只需復制您在前面部分中使用的代碼(或將所有本教程中針對 manage_options 功能的原始測試部分)。
在您的插件中,添加以下內容:
// add new dashboard widgets function wptutsplus_add_dashboard_widgets() { wp_add_dashboard_widget( 'wptutsplus_dashboard_welcome', 'Welcome', 'wptutsplus_add_welcome_widget' ); wp_add_dashboard_widget( 'wptutsplus_dashboard_links', 'Useful Links', 'wptutsplus_add_links_widget' ); } function wptutsplus_add_welcome_widget(){ ?> This content management system lets you edit the pages and posts on your website. Your site consists of the following content, which you can access via the menu on the left:
- Pages – static pages which you can edit.
- Posts – news or blog articles – you can edit these and add more.
- Media – images and documents which you can upload via the Media menu on the left or within each post or page.
On each editing screen there are instructions to help you add and edit content. Some links to resources which will help you manage your site:
這會在儀表板屏幕的左側添加兩個新的元框。您現在擁有一個定制的儀表板!
摘要
在本教程中,您學習了如何做三件事:
- 從儀表板中刪除元框
- 將元框從儀表板的一個部分移至另一部分
- 添加新的儀表板元框
您選擇添加到元框的內容取決于您。您可以包含培訓視頻的鏈接,幫助用戶編輯其網站,或添加指向您自己的博客或網站的鏈接。或者你可以把當天的想法放在那里 – 無論對你有用什么!


